SSL:
we are going to set-up SSL on Apache Web Server with the WebLogic plug-in that load balances to a WebLogic Dynamic Cluster (with a few managed servers that have SSL enabled), by using a custom identity and custom trust (as we are going to use self signed certificates).
WebLogic supports secure communications with clients and other servers using either Secure Sockets Layer (SSL) or Transport Layer Security (TLS) connections. Note that TLS is essentially the next generation SSL. SSL supports two different connection modes or types. The two types are commonly called one-way and two-way SSL. One-way SSL allows the SSL client to verify that the SSL server is, in fact, who it claims to be. Two-way SSL extends one-way SSL by allowing the SSL server to verify that the client is who it claims to be.
These verifications are accomplished through the use of public/private key technology. This technology uses a set of two related keys known as a public key and a private key for encryption and signing purposes. Anything encrypted using the public key can only be decrypted using the private key, and vice versa. As the names suggest, the owner of the private key keeps this key locked away where only the owner has access to it and gives its public key to everyone who might need it. Private key files are additionally encrypted with a pass phrase that must be supplied to get the actual private key as an additional safety check against unauthorized use. The standard way of distributing public keys is to use X.509 certificates that contain information about the certificate's owner and the public key.
X.509 certificates are issued by certificate authorities that digitally sign the certificates with their private key to allow verification through the use of their public key. In some cases, the signing authority's certificate might have been signed by another authority and so on. This brings about the notion of a certificate chain where the top of the chain is known as the root certificate authority (CA) whose certificate is always self-signed. When we get the CA's certificate, that certificate will generally contain the entire certificate chain back to the root CA. This root CA or certificate chain is used by the receiver of the original certificate to determine whether it trusts that the certificate is legitimate.
With one-way SSL, the SSL client uses the server's certificate (actually, the public key contained in the certificate) to encrypt a symmetric session key that is sent to the server. The server decrypts the session key with its private key. Both the client and the server use that key to encrypt and decrypt data for the duration of the session. This is why it is critical for the server to keep its private key safe and its pass phrase a secret.
With two-way SSL, the server will request a certificate from the client that it then uses to identify and authenticate the client. In order for the client to trust the certificate provided by the server, it must verify the signing chain of the server's certificate. If the client trusts the server's certificate authority, it can verify the server's certificate and prove that it is real and has not been tampered with. This verification requires the client to have the CA's certificate for the server available locally, as a notion of which certificates the client will trust. The server must use the exact same mechanisms to verify the client's certificate. The server requires the client's root CA's certificate locally for two-way SSL. Notice the concepts of identity and trust for both the SSL server and the SSL client. The identity is the certificate and private key. The trust is the certificate authority.
Configure SSL in WebLogic:
1. Generating the certificate:
Step 1: Open command prompt and set the environment by running the setDomainEnv script.
(C:\bea10.3\user_projects\domains\practice_domain\bin\setDomainEnv.cmd)
Step 2: Generate the private and public key pair for demonstration we would use keytool java utility to do so. how ever we can use other utilities like openssl etc.
keytool -genkey -alias mykey -keyalg RSA -keysize2048 -keystore identity.jks
Step 3: Generate a certificate signing request (CSR) and send it to Certificate Authority.
keytool -selfcert -alias mykey -keystore identity.jks
Step 4: Create a identity keystore, this can be done my exporting
keytool -export -alias mykey -file cert.cer -keystore identity.jks
Step 5: Create a trust keystore this can be done my importing.
keytool -import -alias mykey -file cert.cer -keystore trust.jks -noprompt
To verify the contents of the keystore, you can use the below command....
keytool -list -v -keystore <keystore-name> -storepass<keystore- password>
2. Configuring the keystore on the WebLogic Server:
Step 1: Log into the Admin Console, Click on servers
Step 2: Click on lock and edit
step 3: Select the server on which you want to configure the SSL certificate.(Ex:managedserver1)
step 4: Click on key restores
Step 5: Select Custom identity and Custom trust
Identity :
CustomIdentitykeystore: C:\bea10\user_projects\domains\Trainig_domain\identity.jks
Custom Identity keystore type: jks
Custom identity passphrase: Sv12345
Trust:
Custom trust keystore: C:\bea10\user_projects\domains\Trainig_domain\trust.jks
Custom trust keystore type: jks
Custom trust passphrase: Sv12345
àsave ---àAcivate changes
Step 6: Click on SSL
Step 7: Enter identity
Private key alias:mykey
Private passpharse: sv12345
---save ---Activate changes
To check SSL type browser https://localhost:5003
(managedserver1 ssl portnumber)
/mess
(deploying application)
1-way SSL Diagram:
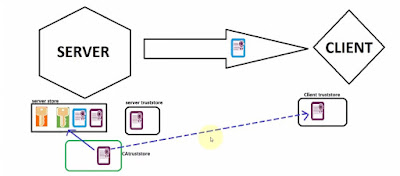
2-way SSL Diagram:

we are going to set-up SSL on Apache Web Server with the WebLogic plug-in that load balances to a WebLogic Dynamic Cluster (with a few managed servers that have SSL enabled), by using a custom identity and custom trust (as we are going to use self signed certificates).
WebLogic supports secure communications with clients and other servers using either Secure Sockets Layer (SSL) or Transport Layer Security (TLS) connections. Note that TLS is essentially the next generation SSL. SSL supports two different connection modes or types. The two types are commonly called one-way and two-way SSL. One-way SSL allows the SSL client to verify that the SSL server is, in fact, who it claims to be. Two-way SSL extends one-way SSL by allowing the SSL server to verify that the client is who it claims to be.
These verifications are accomplished through the use of public/private key technology. This technology uses a set of two related keys known as a public key and a private key for encryption and signing purposes. Anything encrypted using the public key can only be decrypted using the private key, and vice versa. As the names suggest, the owner of the private key keeps this key locked away where only the owner has access to it and gives its public key to everyone who might need it. Private key files are additionally encrypted with a pass phrase that must be supplied to get the actual private key as an additional safety check against unauthorized use. The standard way of distributing public keys is to use X.509 certificates that contain information about the certificate's owner and the public key.
X.509 certificates are issued by certificate authorities that digitally sign the certificates with their private key to allow verification through the use of their public key. In some cases, the signing authority's certificate might have been signed by another authority and so on. This brings about the notion of a certificate chain where the top of the chain is known as the root certificate authority (CA) whose certificate is always self-signed. When we get the CA's certificate, that certificate will generally contain the entire certificate chain back to the root CA. This root CA or certificate chain is used by the receiver of the original certificate to determine whether it trusts that the certificate is legitimate.
With one-way SSL, the SSL client uses the server's certificate (actually, the public key contained in the certificate) to encrypt a symmetric session key that is sent to the server. The server decrypts the session key with its private key. Both the client and the server use that key to encrypt and decrypt data for the duration of the session. This is why it is critical for the server to keep its private key safe and its pass phrase a secret.
With two-way SSL, the server will request a certificate from the client that it then uses to identify and authenticate the client. In order for the client to trust the certificate provided by the server, it must verify the signing chain of the server's certificate. If the client trusts the server's certificate authority, it can verify the server's certificate and prove that it is real and has not been tampered with. This verification requires the client to have the CA's certificate for the server available locally, as a notion of which certificates the client will trust. The server must use the exact same mechanisms to verify the client's certificate. The server requires the client's root CA's certificate locally for two-way SSL. Notice the concepts of identity and trust for both the SSL server and the SSL client. The identity is the certificate and private key. The trust is the certificate authority.
Configure SSL in WebLogic:
1. Generating the certificate:
Step 1: Open command prompt and set the environment by running the setDomainEnv script.
(C:\bea10.3\user_projects\domains\practice_domain\bin\setDomainEnv.cmd)
Step 2: Generate the private and public key pair for demonstration we would use keytool java utility to do so. how ever we can use other utilities like openssl etc.
keytool -genkey -alias mykey -keyalg RSA -keysize2048 -keystore identity.jks
Step 3: Generate a certificate signing request (CSR) and send it to Certificate Authority.
keytool -selfcert -alias mykey -keystore identity.jks
Step 4: Create a identity keystore, this can be done my exporting
keytool -export -alias mykey -file cert.cer -keystore identity.jks
Step 5: Create a trust keystore this can be done my importing.
keytool -import -alias mykey -file cert.cer -keystore trust.jks -noprompt
To verify the contents of the keystore, you can use the below command....
keytool -list -v -keystore <keystore-name> -storepass<keystore- password>
2. Configuring the keystore on the WebLogic Server:
Step 1: Log into the Admin Console, Click on servers
Step 2: Click on lock and edit
step 3: Select the server on which you want to configure the SSL certificate.(Ex:managedserver1)
step 4: Click on key restores
Step 5: Select Custom identity and Custom trust
Identity :
CustomIdentitykeystore: C:\bea10\user_projects\domains\Trainig_domain\identity.jks
Custom Identity keystore type: jks
Custom identity passphrase: Sv12345
Trust:
Custom trust keystore: C:\bea10\user_projects\domains\Trainig_domain\trust.jks
Custom trust keystore type: jks
Custom trust passphrase: Sv12345
àsave ---àAcivate changes
Step 6: Click on SSL
Step 7: Enter identity
Private key alias:mykey
Private passpharse: sv12345
---save ---Activate changes
To check SSL type browser https://localhost:5003
(managedserver1 ssl portnumber)
/mess
(deploying application)
1-way SSL Diagram:
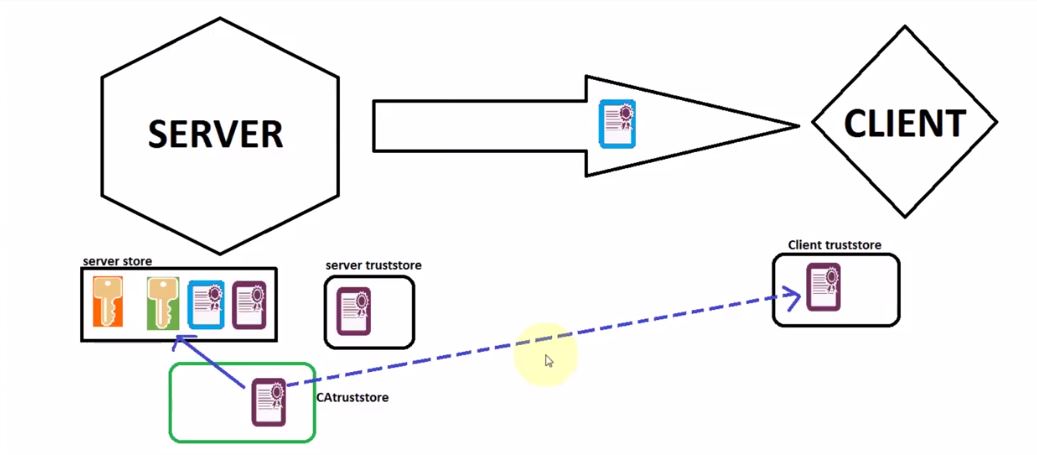
2-way SSL Diagram:

No comments:
Post a Comment